
Blog
Underwater Photography

Oct
It might not yet be time to pack for the summer holiday, but it is never too early to plan for your next trip to an island paradise. We all admire the colourful and fascinating underwater world – why not try and capture this scenery yourself, in photography or even on video!
In this article I want to give you the basics to get you started in what could become a fascinating new hobby. First we’ll look at the necessary hardware, then we’ll examine the challenges of lighting imposed by underwater conditions, and finally I want to give you some general tips before you dive into underwater photography (pun intended).
Necessary Hardware for Underwater Photography
Your everyday camera might be weather-sealed and splash-proofed, but it won’t survive a serious dive in the ocean. The latest mobile phones are “waterproof/resistant” and can deal with a dunk or two in the pool, or even a short dip into the ocean, but it is a good idea to protect them with a waterproof floating phone case. The cheapest option is to put your phone into an airtight ziplock bag. And yes, that still allows you to use the touchscreen.
There are tailor-made transparent housings for your point-and-shoot camera. They allow you to operate all the camera controls while diving (Image 1).
Image 1 – Underwater housing for Canon Powershot S120
For DSLRs and high-quality full-frame mirrorless cameras you will need a more sophisticated housing which can cost up to $2000 (Image 2). Most of these housings can get you down to a depth of 40 m. In addition to the camera housing you’ll probably want to have external strobes or lights, and if you are planning shooting videos, then a waterproof monitor will come in handy. Note that there are flat ports (Image 1) which give you a zoomed-in image (usually not ideal). In contrast, domed ports (Image 2) compensate for the additional refraction of water.
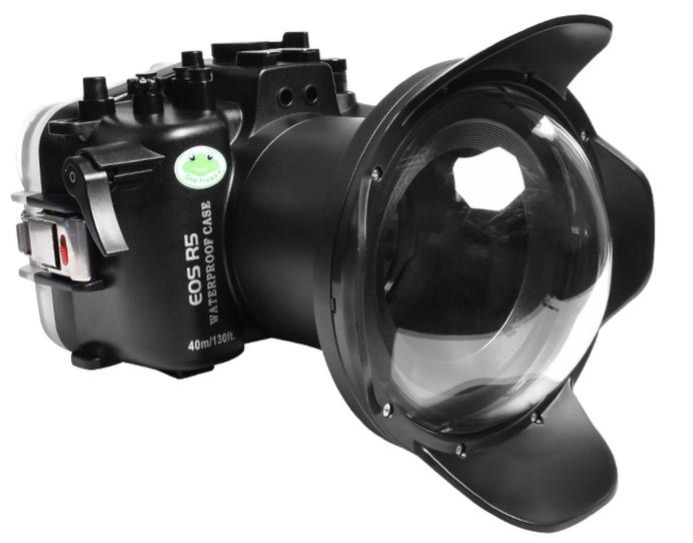
Image 2 – Underwater housing for high-quality full-frame cameras (Canon EOS R5)
Another option is to get a camera specially dedicated to underwater photography. There are a couple of compact point-and-shoot cameras on the market which you can take down a few meters underwater, without special housing, and they are ideal for snorkeling.
The SeaLife DC2000 underwater camera is one of the best-known cameras (Image 3). With the special housing you can take it down to 60 m. Image 3 shows you the camera with a double flash adapter.

Image 3 – A dedicated underwater camera
Light in Underwater Photography
Photography is all about light. This also applies to underwater photography, but water is about 800 times denser than air, which brings a lot more interaction between the photons and water molecules. This means that we are losing light very quickly the deeper we go down.
On top of the loss of light we also get a change in colour. Image 4 shows you the spectrum of visible light. The energy of light increases when you go to higher frequency waves (from right to left). Think of the damage ultraviolet rays do to your skin!
Image 4 – The electromagnetic spectrum of visible light
As a result the weaker part of the spectrum (red) will get absorbed first by the water. Image 5 shows you how this works out in practice when we go underwater: the red colours are lost at around 5 m, then we start losing the orange and yellow parts of the spectrum, and at around 60 m depth we are only left with blue colours (and it gets pretty dark!).

Image 5 – Light absorption under water
As a photographer you know the rule: avoid taking photos around midday. The early morning or late afternoon light gives us the most attractive shots. In the underwater world it is quite the opposite. The best time for underwater photography is when the sun is directly overhead, allowing us to capture as much light as possible.
Not only do we lose the warmer colours the deeper we go down, but we also need to take the distance between camera and our object into account. As a general rule, your object should be less than a meter away from your lens. When on land, we reach for the telephoto lens when we think of shooting animals; under water we mainly use wide-angle and macro lenses.
Because of the missing warmer light colours when shooting with natural light, a flash is one of the most important accessories for the underwater photographer, or a permanent light source for filming. If you shoot with a compact camera, set the flash to ‘forced flash’, not automatic. You will get the best results, and pleasing colours, when you set your camera to macro and get really close to your subject.
Of course, you don’t keep to the 1 m rule when shooting sharks or whales, or fellow divers. In fact, you can create beautiful natural light photography with your subjects showing up as silhouettes (Image 6).
Image 6 – Silhouettes are very effective when restricted to natural light
Usually, the photographer will try to create an aesthetic balance between available sunlight and artificial light. If the object is more than about 30 cm away, the on-camera flash is likely to give you ‘backscatter’. This is caused by fine particles in the water and will ruin your shots with lots of fine white dots against a dark background. The only remedy is to use an external strobe (or two), away from the axis of the camera lens.
Important Tips for the Novice
Underwater photography can get expensive, on top of all your regular diving gear and it pays to make the right decisions and take the right steps before you take the plunge.
– When you decide to get a housing for your camera, pay special attention to the smallest parts: the O-rings and the special lubricant they require. Try out the housing, first without camera, in your bathtub and watch out for any bubbles (a bad sign!).
– Your camera in the housing will feel very different and it is important to do some practice runs on dry land to familiarise yourself with all the camera functions. The next step is a practice session in the swimming pool.
– You need to be fairly confident in your diving skills. Keep in mind that you will need at least one hand to hold the camera and often two hands to operate it properly. The anxiety level when you step into the water goes up proportionally with the cost of the camera.
– Try to get as close as possible to your object. Fish are usually curious and not shy at all if you move slowly (Image 7 and 8).

Image 7 – Try to get a head shot of your subject

Image 8 – The closer you can get, the better
– Shoot in Raw format! There is only so much you can do with JPEG files. Most of your shots will need a boost in contrast and some colour correction. Especially tweaking the white balance is so much easier with Raw files.
There are plenty of resources available on the internet to answer all your questions, but I hope that this brief introduction will encourage you to take your photography hobby to the next level.