
Blog
Depth of Field in Photography

Oct
One of the attributes which distinguishes a simple snapshot from a good photo is how well the message is presented to the viewer. Depending on the scene you’re photographing, you have a certain amount of control over what is going to be sharp and prominent in your shots, making it stand out against a blurred back- or foreground. Learning about depth of field and how to apply it will take your photography up to the next level.
What is this ‘Depth of Field’?
The depth of field (DOF) is the zone of acceptable sharpness within a photo. It is the distance between the nearest and the farthest objects that are in acceptably sharp focus. We will come to this ‘acceptably sharp focus’ just now, but for the moment you need to remember that there is, strictly speaking, only one plane at a certain distance from your lens which will come out absolutely sharp in your photo.
At the precise focus distance a point object will produce a point image on your camera’s sensor. A point object not in the precise focus distance will produce a blur spot, roughly shaped like a circle. Our eyes have a limited resolving power and if that blur spot is sufficiently small, then the object will appear in focus. In photography this blur spot is called ‘circle of confusion’. The acceptable circle of confusion will depend on how we view the final image. In general, a circle of confusion of 0.25mm is acceptable for an image viewed from 25cm away. Images 1 and 2 illustrate this principle with a simple convex lens.
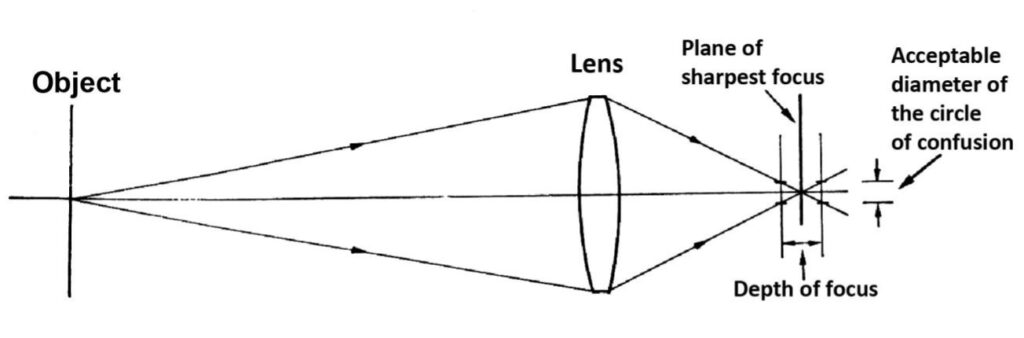
Image 1 – Defining the Circle of Confusion

Image 2 – DOF and the Circle of Confusion
Factors affecting the DOF
With all that physics out of the way, we now can concentrate on photography again. For a given circle of confusion the DOF is determined by:
- Distance to subject
Focal length of the lens
3. Lens aperture
You will also hear that the size of the camera sensor has an effect of the DOF, with a larger sensor (for example, a full-frame 35mm sensor) giving you a more shallow DOF than a tiny phone camera sensor. However, strictly speaking this is not correct and we’ll discuss that later.
Before we go into the various ways of influencing the DOF, let us first look at how this DOF affects our images. There are times when you want everything in your photo to look tack sharp. Think of a landscape photo or a product shot for a catalogue. A real estate photographer will aim for that kind of look.
Contrast this with an artistic shot where only the flower bouquet on the table is in focus and the rest of the room appears out of focus. The viewer’s eye will be drawn to the one object which appears sharp and in focus. Portrait photography is the prime example where you want to eliminate a distracting background. In photography we call this a shallow depth of field.
The effect of distance to subject and the focal length on the DOF are interrelated, so I’ll discuss them together. The closer you get to your subject the more shallow the DOF will get. And a longer lens (telephoto lens) will also give you a more narrow DOF than a shorter (wide angle) lens.
For example, if your subject is 10 meters away, using a focal length of 50mm at f/5.6, your DOF would range from 6.1 to 28.1m, which gives a total of 22m. This goes down to 3.3m if you use a 100mm lens. If you double the focal length and the distance, then your subject will be roughly the same size, but your DOF will shrink as well. Keep in mind that the relationship between your subject and the background will have changed: a telephoto lens will give you a more narrow angle of view with less background around your subject.
Table I
DOF as Function of Focal Length and Subject Distance
Full Frame Camera, f/5.6
|
Focal Length (mm) |
Subject Distance (m) |
DOF range (m) |
DOF total (m) |
|
50 |
10 |
6.1 – 28.1 |
22.0 |
|
100 |
10 |
8.6 – 11.9 |
3.3 |
|
100 |
20 |
15.1 – 29.5 |
14.4 |
In short, the DOF shrinks when you get closer to your subject. Wide angle lenses give you a deeper DOF, whereas telephoto lenses give you a shallow DOF.
Effect of Aperture on DOF
There is a lot you can do with distance and focal length to achieve your desired DOF, however, there is a third parameter you can control, which is particularly useful when you are constrained with space or the perspective you want to achieve.
We are now talking about the aperture, or the f-stop, as it is called in photography. The more you stop your lens down (use a higher f-stop) the more your DOF will increase. Conversely, if you shoot with your lens ‘wide open’, you achieve a shallow DOF.
Image 3 shows you the common series of f-stops, starting with f/1.0. Going from the right to left, every stop is going to double the amount of light reaching the sensor.

Image 3 – The Series of F-stops
The following image gives you a good illustration of the effect of aperture at constant distance and focal length. It is a page from a book, shot at an angle with the focus on the middle of the page, using a 100mm lens.
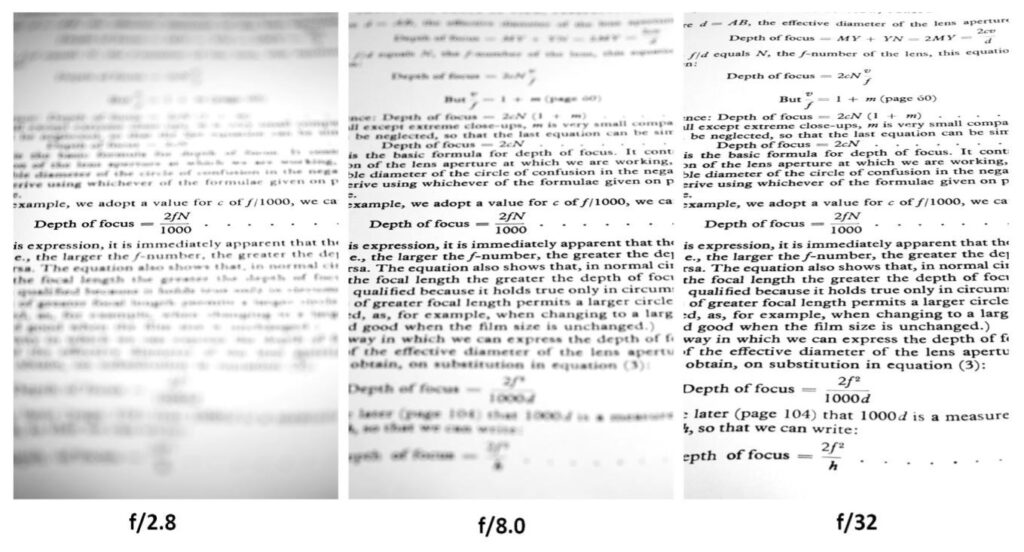
Image 4 – Effect of Aperture on DOF, 100mm lens
In other words, if you want a wide DOF you need to stop down your lens (to a high f-stop number) and vice versa. Keep in mind that very high f-stop numbers, f/16 or more (for full-frame cameras) will reduce overall sharpness due to diffraction!
Hyperfocal Distance and DOF Calculators
From Table I it is apparent that the DOF is not evenly distributed – there is less area of sharpness in front and more behind the focal point, depending on how far away the object is. And that takes us to the hyperfocal distance. When you focus to that point, then the DOF will extend all the way to infinity. A DOF calculator will give you that distance (see Image 5). As a rule of thumb, if you want everything in a landscape shot to be sharp, focus a third of the way into the scene. A wide angle lens and an aperture setting of around f/11 will maximise the DOF.
There are apps for your phone or tablet which calculate the DOF for you when you input the distance to object, focal length and aperture. I used this for calculating the values shown in Table I. Some of these apps even let you set the size of the circle of confusion. Image 5 shows you a screenshot.

As we saw, the DOF goes down when you get closer to your subject. This becomes critical once you get into macro photography, where the DOF drops down into the millimeter range – often not enough to get your entire subject into focus. However, there are tricks were you take a number of shots at different settings and combine them later into one image with sufficient DOF.
About Bokeh and Fast Lenses
You’ll often hear photographers raving about the ‘bokeh’ of their pet lenses. This is a (very subjective) measure of how a particular lens renders the out-of-focus part of an image, which can be more or less pleasant to the viewer. Out-of-focus objects should show up as pleasingly soft gradients, and not stand out with busy, hard edges.
‘Fast lenses’ are simply lenses which can focus a lot of light on the sensor, which allows for faster shutter speed (that’s where the name comes from) and also for a very shallow depth of field. For these reasons they are favoured by sports photographers, and also by portrait and wedding photographers.
Images 6 to 8 shows you how much your choice of aperture can influence the outcome of your photography. I tried to get both, a sprouting leaf and a budding flower of our peach tree into the same plane of focus. Image 6 was taken at f/2, showing a very shallow DOF (exactly 2mm, according to the DOF calculator), with only part of the flower in focus. Contrast this with Image 7, taken at f/29, which is far too busy to be aesthetically pleasing. Using a moderate f/5.6 gives us a good compromise (Image 8).

Image 6 – Closeup with 85mm lens, f/2
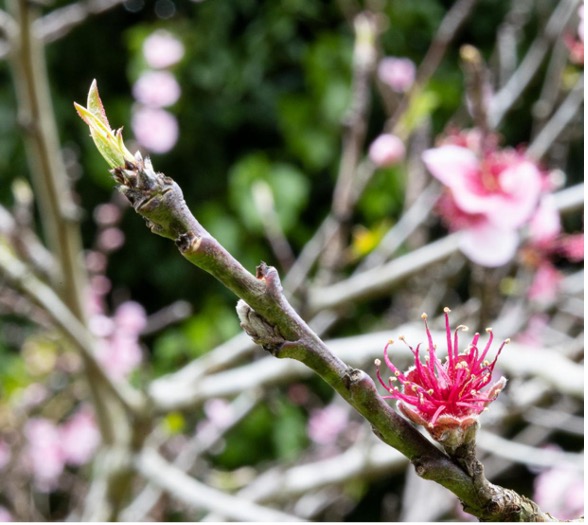
Image 7 – Same lens, but at f/29

Image 8 – Peach Tree in Spring, f/5.6
Professional photographers favour cameras with larger sensors and one of the reasons given is that a larger sensor allows for a more shallow DOF. However, when comparing cameras you need to take the ‘crop factor’ into account, not only for the effective focal length of the lens, but also for the aperture setting. And then you’ll find that there is no difference in DOF. But yes, in practice a larger sensor does make it easier to make your subject stand out against a blurred background.
In practical photography it is not worth getting hung up about exactly how much DOF you will get in your pictures. However, it is important to know when you should aim for a shallow DOF or when you need a wide DOF, and then to adjust your photography to achieve the best results. This will add to the enjoyment and it will take your photography up a notch to a new level.
______________________________________________________________________
The illustrations are taken from “The Manual of Photography”, edited by Alan Horder. Focal Press Ltd, 1975.
Equipment used:
Canon EOS R
Canon EF 100mm f/2.8 L Macro IS USM
Canon RF 85mm f/2 IS STM