
Blog
Get Creative with Polarised Light

Oct
If you started your photographic career during the film era, you might have noticed that people don’t use filters as much as they used to. The polarising filter is the only one that has survived, and that’s simply because it can’t be simulated digitally.
The use of polarising filters in landscape photography is well-known. However, in this article I am going to demonstrate some cool effects with crystals, producing psychedelic colours which you can replicate in your home – ideal for the winter months! They should spark your creativity and will open the door to endless fun.
But first let’s look at some of the theory around polarisation.
Polarised Light - Linear and Circular Polarising Filters
Visible light is part of the electromagnetic spectrum in which an electric field oscillates at a right angle to the direction of the light. Most light sources emit non-polarised light, where the light waves oscillate in all directions. Image 1 shows you the light coming from a light bulb vibrating in only two directions, but you need to imaginethem oscillating  in all directions, not just in two planes. When non-polarised light hits a polarising filter, then the light beam gets polarised, with the electric field oscillating in just one plane (Image 1).
Light also becomes polarised when reflected off all kinds of non-metallic surfaces, including water. You can reduce, or even eliminate those reflections when putting a polarising filter on your lens.
Linear polarisers are more effective and less expensive than circular ones. But circular filters are needed with just about any DSLR camera. This is because their metering and autofocus systems use a semi-silvered mirror to siphon off some of the light coming through the lens. If that light is linearly polarised then the auto-functions won’t give you reliable results. Mirrorless cameras will work fine with the cheaper linear polarisers (another advantage of mirrorless cameras!).
A circular polariser will give you the same results as its cheaper sibling. It is just a linear polariser followed by a quarter-wave plate set at 45° to the axis of polarisation. Without going into any detail, you might think of circular polariser as a normal polarising filter with its linear polarised light then ‘stirred up’ in order to not cause any problems with camera mirrors or prisms.
For our experiments you’ll need two polarising filters. You can use inexpensive polarising filter sheets, or even cut them out from cheap 3D glasses. You’ll find plenty of suggestions when you search on YouTube. Image 2 shows you the effect of two polarising filters placed on a light table: (1) with aligned filters, you see only a slight reduction in light where the filters overlap. When one of the filters is turned by 90°, the light is totally blocked (2). Placing a glass plate with some crystals between the filters will give you some interesting colour effects (3).

Image 2 – Two polarising filters on a light table
Birefringence and Psychedelic Colours
That last image gave us already a glimpse of what to expect. Placing crystals between two cross-polarised filters will give you a barrage of rainbow colours, which are just waiting to be photographed! The technical term is birefringent materials, which split light into two rays that are both polarised at right angles to one another and traveling at different velocities.
As a source of crystals you can try your hand on any chemicals you can find in your home. Ascorbic acid (vitamin C) is very popular and also citric acid, and aspirin from the medical cupboard. I found that urea gives you very attractive crystal needles. Urea is a common fertiliser and available in any garden centre.
First you need to make solutions of your chemicals and let them crystallise on a glass plate. Solutions in water take a long time to dry and most people recommend using mixtures of water and alcohol as solvent. I used microscope slides, but any glass plate will do. Perhaps you have an old, unused UV filter lying around (Image 3).

Image 3 – Using an eyedropper to place the solution on a glass plate
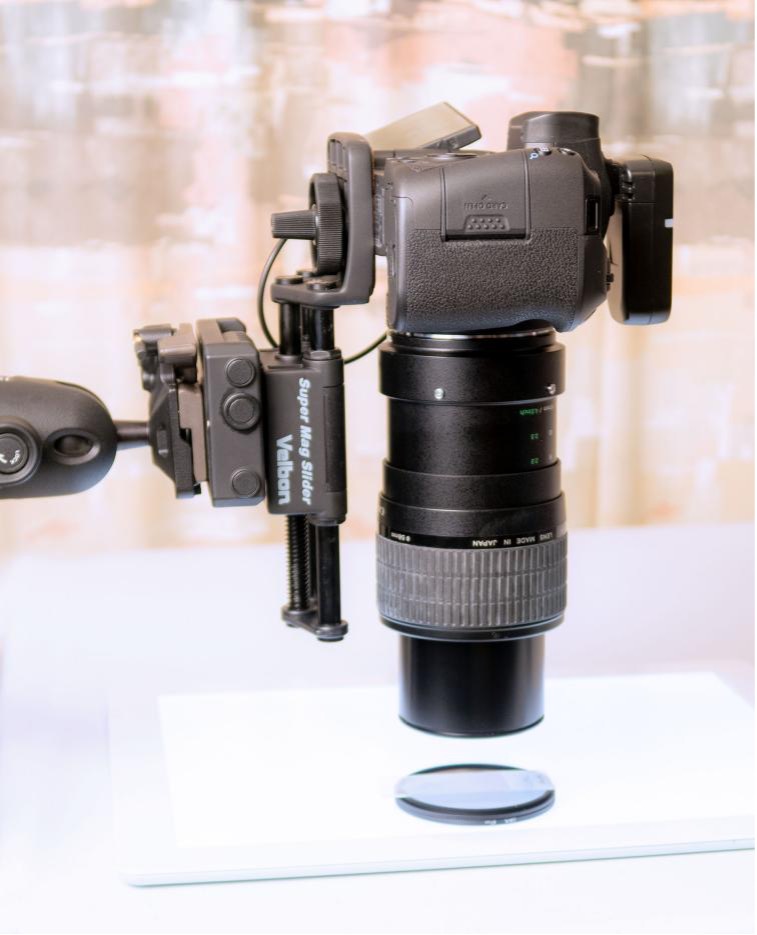
Image 4 – The macro setup used. The glass slide with the sample is placed on a polarising filter sitting on top of a light table. The second polariser is attached to the macro lens.
Crystals are very small and you will need to try your hand on some macro photography. A small (and cheap, about 10x magnification) microscope is generally recommended, but not necessary. I did all the photography shown here with a macro lens. Image 4 shows you my setup.
A macro lens is great and you can increase the magnification with extension tubes placed between camera and lens. Close-up filters are also a cheap solution, and they can be stacked for higher magnification. A quick way of getting into macro photography is to simply use your ordinary lens attached with a reverse ring.
Needless to say, a solid tripod is essential. I also use a macro stage for better focus control and a wireless shutter release to eliminate vibrations.


The outcome of your experiments will depend on the size of the crystals and their density. You can play around with more or less concentrated solutions, different water/alcohol ratios and drying temperatures. It might encourage you to learn that the shown images were my very first attempt at photographing crystals in polarised light!
Equipment used:
Canon EOS R
Canon Macro MP-E, 65 mm, f/2.8
Extension tubes
Two circular polarising filters
A3 LED Light table